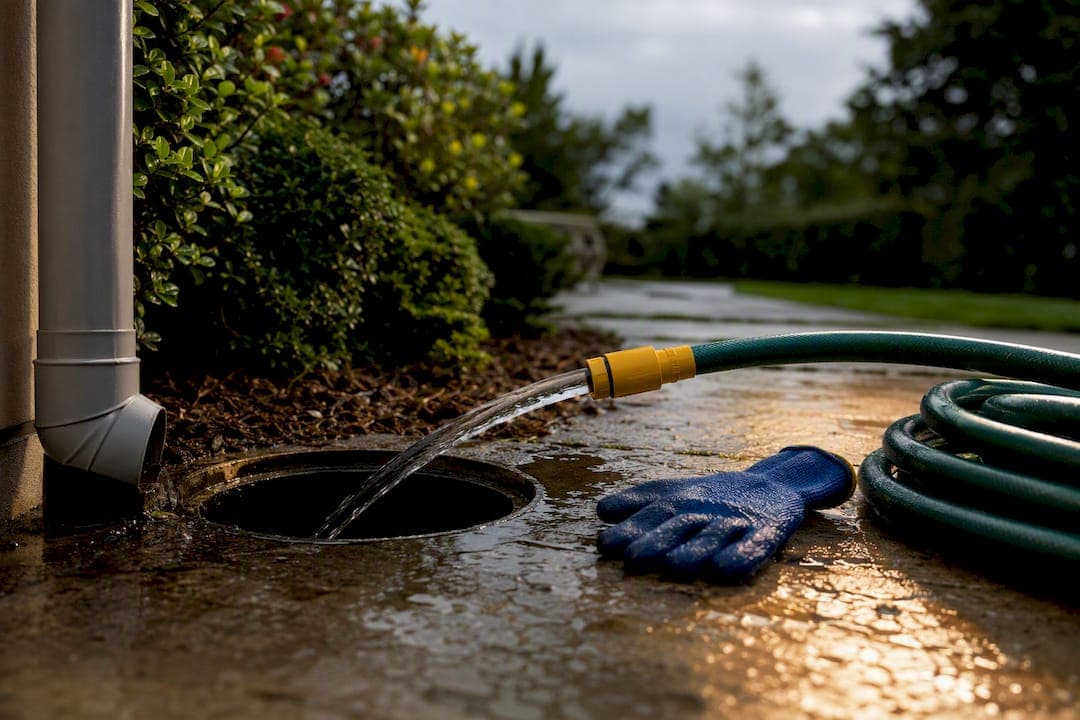
Most underground downpipe blockages can be cleared without digging, using a garden-hose flush test followed by an auger or blow bag before you ever think about excavation. Disconnect the downspout, feed a hose into the buried run, and watch what happens at the outlet: no flow at all, or water backing straight up, confirms the clog sits below ground. Call a professional if water starts creeping towards your foundations, the same clog keeps returning, or a probe pulls back soil and stone instead of leaves.
TL;DR:
- Most underground downpipe blockages can be cleared with a hose flush and basic tools, but recurring or soil-related clogs often require professional inspection.
- Water pooling at the base of the downspout during light rain indicates a buried pipe blockage beyond the vertical run, especially if no water exits the outlet.
- Using CCTV inspection clarifies whether issues are caused by root intrusion, bellies, or structural damage, guiding appropriate repairs like relining or excavation.
- Building catch basins or installing filters can prevent most blockages, reducing the need for costly and disruptive digging by keeping debris visible and accessible.
- Professionals typically respond within 90 minutes, combining camera surveys and high-pressure jetting, with transparent fixed pricing and clear reporting on underlying pipe conditions.
Table of Contents
- How the buried downpipe run works and what causes it to block
- Signs the blockage is underground: a short diagnostic checklist
- How to locate the outlet and run a garden-hose flush test
- Progressive clearing methods: from gentle to professional
- When to camera the line and how results shape the repair
- What a professional call-out actually looks like
- Preventing repeat underground blockages
- A typical call-out, from the first phone call to the fix
- Budget Rodz: fast, camera-led help when DIY hits a wall
- Sources
How the buried downpipe run works and what causes it to block
A downpipe system looks simple from the outside, but there are five parts working together, and any one of them can fail. The downspout carries water from the gutter to ground level. An adapter or elbow connects it to the buried pipe. That underground run, usually rigid PVC or corrugated plastic, travels several metres to a catch basin or straight to a daylight outlet. Some systems include a cleanout, a capped access point that lets you get a tool into the line without lifting turf.
Blockages tend to fall into two categories: things that arrived from above, and things that went wrong with the pipe itself. Local drainage specialists consistently list leaves, moss and silt as the most common triggers for a downpipe that stops draining, and that matches what turns up on most call-outs.
- Leaves and shingle grit wash down from the gutter and settle at bends, where flow slows enough for them to pile up.
- Silt and soil work their way in through cracked joints or a settled connection where the pipe meets the catch basin.
- Bird nests and debris sometimes lodge at the downspout inlet before water ever reaches the underground section.
- Roots exploit the smallest gap in a joint, then expand until they choke the bore completely.
- Bellies (a sag in the pipe caused by ground settlement) create a permanent low point where sediment and water collect no matter how often you clear it.
- Joint failures, where sections have shifted apart or crushed under vehicle weight or nearby digging, leave a step or gap that snags anything passing through.
The distinction matters because it changes what "fixed" actually means. Clear a leaf jam and the pipe runs freely again for years. Clear a belly and you've bought yourself a few weeks before it fills back up, because the underlying shape of the pipe hasn't changed. That's the trap a lot of homeowners fall into: they treat every clog as the same problem and wonder why the same spot keeps flooding every autumn.
Signs the blockage is underground: a short diagnostic checklist
Water pooling right at the base of the downspout, even during light rain, is the clearest tell that the problem lies past the visible pipework. If the gutter itself drains fine into the downspout but nothing comes out at the far end, the clog isn't in the gutter or the vertical run, it's buried.
Run through these checks before you touch a tool:
- Watch the downspout during rainfall. If water backs up and overflows at a joint rather than disappearing underground, the blockage is below that point.
- Check the outlet. Walk the likely path of the pipe to where it should surface, whether that's a pop-up emitter, a kerb, or a ditch, and see if anything is coming out at all.
- Look for wet or sunken lawn patches tracing a line away from the house. A soggy strip is often the buried pipe leaking at a failed joint rather than simply blocked.
- Listen for a hollow gurgle at the downspout base after you pour a bucket of water in. A quick drain with no gurgle suggests a clear run; a rising, static level with no sound at all suggests a solid stop nearby.
- Note whether the same spot floods repeatedly after you've already cleared it once. A blockage that keeps coming back within weeks points to a structural cause, not a fresh load of leaves.
None of these checks need special kit, just patience and a bit of rain, or a bucket if you can't wait for the weather. What they give you is a rough map: is the problem near the house, halfway along the run, or right at the outlet? That answer decides which tool you reach for next.
How to locate the outlet and run a garden-hose flush test
Before any real diagnosis, you need two things: access at the top of the run and a known point downstream to watch. Skipping the downstream check is the single biggest reason DIY attempts go nowhere, because you end up guessing whether water moved at all.
What you'll need: a garden hose with reasonable pressure, a screwdriver or nut driver for the downspout straps, an old towel or rag, and gloves.
- Remove the downspout adapter at the base, usually held by a screw or crimped band. Set it aside, keeping the fixings together so it goes back on cleanly.
- Locate the downstream end of the pipe before you start. Look for a pop-up emitter in the lawn, a capped pipe at a kerb, or a visible daylight exit at a slope. If you genuinely can't find it, trace the likely route from house plans or by probing gently along the expected line with a thin rod.
- Feed the hose a short way into the opening, then loosely pack the rag around it so most of the water is forced down the pipe rather than spraying back at you.
- Run the water for three to five minutes at a steady flow, not full blast, and watch the outlet the whole time.
- Note the result. Steady flow out the far end within a minute or so means the run is basically clear and your original clog was likely at the inlet. No flow, or a delayed trickle, confirms an obstruction somewhere in the buried section.
Pro Tip: If you can get to the outlet first, run the hose from that end back towards the house instead. Flushing from downstream pushes loosened debris out of the pipe rather than driving it deeper into the run, which is the approach experienced DIY troubleshooters consistently recommend over blasting from the top.
If you can't find the outlet at all after a reasonable search, that's worth flagging to a professional rather than guessing. Buried pipes occasionally daylight somewhere unexpected, and a CCTV drain survey settles that question in minutes rather than an afternoon of digging test holes.
Progressive clearing methods: from gentle to professional
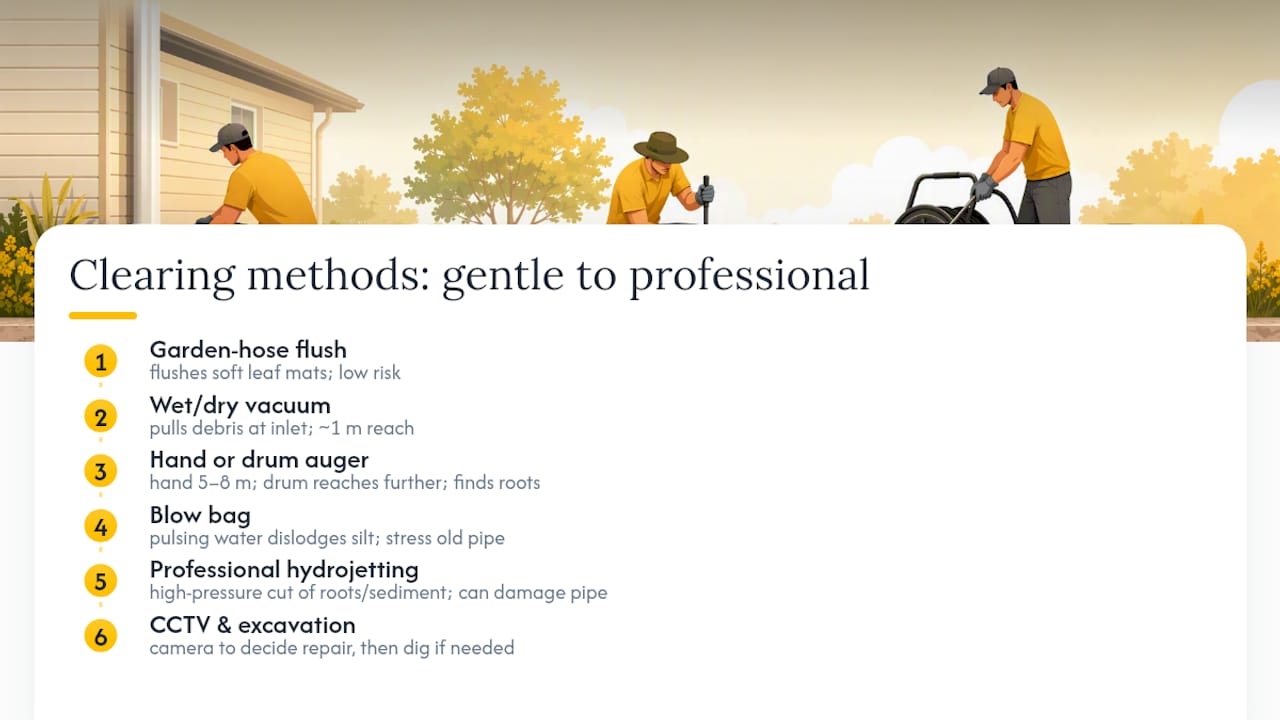
Work through these methods in order, because starting with the most aggressive tool on a simple leaf jam is how people crack ageing pipes that were otherwise fine. A staged approach clears most underground gutter drain clogs: hose flush, then auger, then blow bag or hydrojet, with a camera only if those steps fail.
1. Garden-hose flush. Already covered above, this handles loose leaf mats and light silt sitting near an access point. It's free, low-risk, and tells you immediately whether you're dealing with something soft or something solid.
2. Wet/dry vacuum. For debris sitting right at the base of the downspout or just inside the underground opening, a shop vac with a hose attachment can pull out compacted leaf mulch that water alone won't shift. This only reaches the first metre or so, so treat it as a first-pass tool, not a cure.
3. Hand or drum auger. A drain auger (sometimes called a plumber's snake) physically breaks up and hooks debris as you feed it through the pipe by hand or with a small drum motor. A basic hand auger typically manages 5 to 8 metres; a drum auger with a motor can push considerably further and handle root intrusion that a hose simply bounces off. What comes back on the head tells you a lot: soggy leaf matter means an organic clog; soil, grit, or a hard stop that won't budge suggests a structural problem rather than debris.
4. Blow bag. Attached to a hose and inflated inside the pipe, a blow bag uses pulsing water pressure to dislodge stubborn silt and light root growth. It works well in short to mid-length runs but needs care in older clay or thin-walled pipe, where the pulsing action can stress a joint that's already borderline.
5. Professional hydrojetting. This is the strongest non-excavation option available, using a high-pressure water jet to cut through root masses, grease, and packed sediment that hand tools can't touch. Trade guidance is consistent that hydrojetting handles stubborn clogs other methods can't, but it comes with a real caveat: on fragile, cracked, or perforated pipe, the pressure can enlarge existing damage rather than simply clearing it. For French-drain-style perforated systems specifically, high pressure can force sediment straight into the surrounding fabric and collapse the filter layer, so low-pressure methods are the safer call there.
6. CCTV inspection. Not a clearing method itself, but the decision point that tells you whether to keep clearing or start planning repairs. Covered in full below.
7. Excavation. The last resort, reserved for confirmed structural failure or a plug so old and compacted that no tool will shift it economically. Homeowner and trade experience alike points to digging up and replacing a short section as often quicker and cheaper than repeated equipment hire once you're at this stage.
A snake that comes back carrying soil, stones, or that hits a hard, immovable stop is telling you something important: that's usually a structural breach, not an organic plug, and no amount of repeat clearing will fix it permanently.
When to camera the line and how results shape the repair
Book a CCTV survey the moment your auger pulls back soil or grit instead of leaf matter, or hits a stop that won't move regardless of how hard you push. A camera removes the guesswork entirely, and it's far cheaper than digging up the wrong section of garden on a hunch.
What the footage actually shows:
- Root intrusion, visible as a mass or fine tendrils entering at a joint, often with the exact point of entry clearly marked on the recording.
- Bellies, where the pipe visibly sags and water pools along the base of the frame instead of flowing past.
- Cracked or crushed sections, usually obvious as a break in the pipe wall or a section that's been flattened by ground pressure.
- Offset joints, where two sections no longer line up, creating a lip that catches debris on every single flow.
CCTV footage doesn't just confirm there's a problem, it tells the engineer exactly which repair fits. A localised root mass at one joint might only need jetting followed by root cutting at that specific point. A short belly or a couple of offset joints over a longer stretch is often a strong case for relining, which fits a new pipe inside the old one without digging up the garden. A genuinely collapsed section, on the other hand, usually can't be relined and needs excavation and replacement.
The trade-off between relining and digging comes down to scope and access. Relining is less disruptive and faster, but it needs the existing pipe to be structurally sound enough to support a new liner, and it can be pricier per metre than a straightforward dig on an easily accessible run. Excavation is more disruptive and takes longer to reinstate the ground, but it's the only real option once a pipe has properly collapsed. A camera survey is what tells an engineer which one you actually need before either quote gets written.
What a professional call-out actually looks like
A proper drainage engineer doesn't jump straight to the biggest tool available. The workflow follows roughly the same ladder covered above, just executed faster and with better equipment: triage over the phone, an on-site visual check, an attempt at non-invasive clearing, then a camera if that attempt doesn't resolve it.
- Triage. A few questions about symptoms (pooling location, how long it's been happening, whether it's recurring) narrow down likely causes before anyone arrives.
- On-site check. The engineer inspects visible pipework, the downspout connection, and any accessible catch basin or cleanout.
- First attempt. Hose flush or auger, depending on what the triage suggested, often resolves straightforward organic clogs within the first visit.
- CCTV if needed. Where the first attempt fails or turns up soil/grit, the camera goes in before any further clearing is attempted.
- Resolution. Jetting and root cutting for confined issues, or a written quote for relining or excavation where the footage shows structural damage.
Budget Rodz runs this exact sequence across Ellesmere Port, Wirral, Chester and the surrounding areas, typically arriving within 90 minutes of a call. That speed matters more on a downpipe blockage than people expect, because standing water near a foundation gets worse by the hour, not by the day.
A clog that keeps returning after you've cleared it twice isn't bad luck, it's the pipe telling you the shape underneath has changed. The camera is what proves it, and the footage is what the quote gets built on.
Expect some visible disruption if excavation ends up being the answer, though most call-outs never reach that point. Budget Rodz uses high-pressure jetting and CCTV as standard kit rather than an upsell, works to transparent fixed pricing agreed before the job starts, and sends CCTV footage or photos so you can see exactly what was found and why a particular repair was recommended. If a survey does flag structural damage, the next step is a written quote for relining or excavation, not a surprise invoice after the fact.
Preventing repeat underground blockages
A catch basin at the base of every downspout is the single most effective upgrade you can make, because it turns a buried, invisible clog into a surface-level five-minute job. Rather than sediment and leaves travelling metres underground where you can't see or reach them, they settle in a basin you can lift the lid on and scoop out.
- Fit a catch basin or cleanout at each downspout base if your system doesn't already have one; it's a modest one-off cost against years of avoided digging.
- Add downspout filters or gutter guards to stop leaves and grit entering the system in the first place, particularly under overhanging trees.
- Clear gutters twice a year, ideally in late spring and again after autumn leaf fall, since that's when the bulk of debris actually enters the run.
- Flush the buried section annually with a garden hose even if nothing seems wrong, catching silt build-up before it becomes a full blockage.
- Keep tree roots at a distance from known pipe routes, and think carefully before planting anything with an aggressive root system within a few metres of a buried line.
Pro Tip: Mark the outlet location with a small painted stone or flag once you've found it. It sounds trivial, but half the time lost on a future blockage is spent hunting for the downstream end all over again.
Cover considerations matter too. A catch basin needs enough soil depth above it to avoid frost heave in colder months, and it should sit clear of anywhere you'd drive a mower or vehicle over repeatedly, since compacted soil above a shallow basin is a common reason lids crack.
A typical call-out, from the first phone call to the fix
Most jobs start the same way: a homeowner notices standing water at the downspout after rain and calls to ask whether it's worth a visit or something they should try themselves first. The triage questions are simple: how long has it been happening, is it one spot or several, has anyone already tried clearing it?
On arrival, the engineer checks the visible pipework and any accessible basin before touching a tool, because half the time the answer is obvious just from looking. A hose flush or auger pass usually comes next, and for a straightforward leaf jam or light silt build-up, that's often the entire visit.
Where the auger comes back with soil, or where the same address has called out twice already this year for the same spot, that's the point a CCTV camera goes down the line instead of another round of clearing. The footage gets shown on-site, not described secondhand, so the homeowner can see the root mass, the belly, or the offset joint for themselves before agreeing to anything.
Pricing gets confirmed before work starts, not estimated afterwards, and any repair recommendation, whether that's root cutting, relining, or a short section of excavation, comes with the reasoning attached to the actual footage. That transparency is what turns a stressful, unexpected callout into a fairly straightforward decision.
Budget Rodz: fast, camera-led help when DIY hits a wall
Working through a hose test, an auger, and maybe a blow bag yourself is the right first move, and plenty of underground blockages never need a professional at all. The point where that changes is when the clog keeps coming back, or your auger starts pulling up soil instead of leaves, because at that stage more DIY effort just delays a diagnosis you're going to need anyway. That's the gap Budget Rodz fills: a 90 minute typical response across Ellesmere Port, Wirral, Chester and the surrounding areas, with CCTV and high-pressure jetting brought as standard on every stubborn blockage call, not billed as an extra.

Every job runs on fixed, transparent pricing agreed before work starts, so there's no surprise invoice once the van's already on your drive. That matters most on drainage work, where "just have a look" callouts can otherwise spiral once someone's on-site. Budget Rodz has built its reputation on that clarity, backed by a 5.0 rating across more than 50 Google reviews from customers across the region.
If your downpipe has flooded the same corner of the garden twice this season, or a DIY hose test has already told you the blockage sits well below ground, the next step is straightforward. Book an emergency callout for immediate clearing, or if you want the underlying cause confirmed first, request a CCTV drain survey and get the footage before committing to any repair.
Sources
- Underground gutter drain clogged: how to clear it — The Roofing Brief
- How do I unclog underground downspout pipes? — DIY Stack Exchange
- Engineerskill